
To use a ColorChecker 24 in Lightroom, shoot one RAW frame of the chart in your scene lighting, convert it to DNG format, open it in Adobe DNG Profile Editor, auto-detect the 24 patches, export the .dcp profile, install it in your Camera Profiles folder, and apply it to your photos in the Develop module. The whole process takes about five minutes once you’ve done it a couple of times.
That’s the short version. What almost no one tells you is where the DNG Profile Editor actually lives now, why your profile won’t show up until you restart Lightroom, and how to check that the profile is actually doing what you think it’s doing.
I’ve walked photographers through this workflow for years at CalibVision. Below is the full step-by-step with the details most guides skip.
What You’ll Need Before You Start
Five things. I’ll assume you already have the first two.
- A ColorChecker 24 — any size works, but the Classic at 216×279 mm is the easiest to frame in most shooting situations.
- Adobe Lightroom Classic — not the Cloud version. Lightroom CC and Lightroom Mobile can’t install custom DCP profiles. If you’re not sure which you have, check the app icon: Classic has an LrC badge, Cloud has Lr.
- Adobe DNG Converter — free download from Adobe.
- Adobe DNG Profile Editor — also free, but Adobe has buried it. I’ll give you the direct link in Step 3.
- About five minutes of uninterrupted time.
One quick note. The old “ColorChecker Camera Calibration” plugin that used to run inside Lightroom was discontinued by X-Rite in 2022. If someone’s tutorial tells you to install it, that tutorial is outdated. You don’t need the plugin. Adobe DNG Profile Editor does the same job and it’s free.
Step 1 — Shoot the Reference Frame
Place your ColorChecker 24 in the scene where your subject will be. Same light source, same angle, same distance. This part matters more than anything else in the workflow. If the chart is lit differently from your subject, the profile will be mathematically correct for a scene you never actually shot.
Frame the chart so it fills at least 5 to 10 percent of the image. Smaller than that, and DNG Profile Editor won’t detect the patches reliably.
Three camera settings that matter:
- Shoot RAW only. JPEG has color baked in by the camera, and once it’s baked you can’t undo it. The whole point of color profiling is to work on the unprocessed sensor data before any in-camera decisions get applied.
- Lock white balance to a fixed Kelvin value. Use something like 5500K for daylight or 3200K for tungsten. Auto WB will give you a slightly different color temperature on every frame, which defeats the point.
- Expose for the chart. The white patch (#19) should read close to L* = 95 in your histogram. The black patch (#24) shouldn’t be crushed to zero. If either end is clipped, your profile will be wrong.
That’s one frame. After that, shoot your actual subjects under the same light without changing your exposure or white balance.
Step 2 — Convert Your RAW to DNG
Adobe DNG Profile Editor only accepts DNG files. Your raw file from the camera — CR3, NEF, ARW, RAF, whatever — has to be converted first.
There are two ways to do this, and I’ll recommend one.
Option A — Convert inside Lightroom on import.
When you import your reference file, check “Copy as DNG” in the import dialog instead of the default “Copy” or “Add.” Lightroom does the conversion and drops the DNG into your catalog automatically.
Option B — Use Adobe DNG Converter standalone.
Download Adobe DNG Converter from Adobe’s website — it’s free. Drag your raw file onto the app, pick an output folder, click Convert. Takes about 10 seconds per file.
I use Option B for profile creation. It keeps the original raw file and the converted DNG side by side, which makes versioning easier when you’re building profiles for multiple lighting setups or multiple cameras.
Step 3 — Create the Profile in Adobe DNG Profile Editor
Adobe DNG Profile Editor is the tool that does the actual math. It’s free, but Adobe hasn’t updated it since 2012 and the download page is buried. It still works fine on macOS 13/14/15 and Windows 10/11 despite its age.
Direct download: search “Adobe DNG Profile Editor” on Adobe Labs. The file you want is DNGProfileEditor_1_0_4.zip or similar. On macOS, the download contains a .app bundle that you drop into your Applications folder — no installer. On Windows, unzip and run the executable.
Once it’s installed, here’s what to do:
- Open Adobe DNG Profile Editor.
- File → Open DNG Image. Select the DNG you created in Step 2.
- Click the “Chart” tab in the right-hand panel.
- Click “Detect ColorChecker Chart.”
- If detection is clean, you’ll see 24 colored overlays snap onto the patches. If the overlays are crooked or miss patches, your reference frame isn’t usable — re-shoot it with the chart bigger and more perpendicular to the lens.
- Click the “Color Tables” tab, then click “Create Color Table.”
- File → Export [Your Camera Name] Profile.
- Name the profile with a format you can actually find later. I use
YYYY-MM-DD [Scene] [Camera]. For example:2026-04-25 Studio Strobe Sony A7IV.
The exported file is a .dcp. That’s your profile.
Step 4 — Install the Profile in Lightroom
This is the step people get stuck on. The .dcp file has to go in a specific folder, and that folder is hidden by default on both macOS and Windows.
macOS path:
~/Library/Application Support/Adobe/CameraRaw/CameraProfiles/
The ~/Library folder is hidden in Finder. In Finder, press Cmd + Shift + G and paste the path.
Windows 10 and 11 path:
C:\Users\[YourUsername]\AppData\Roaming\Adobe\CameraRaw\CameraProfiles\
The AppData folder is hidden in File Explorer. Click the address bar and paste the full path with your actual username substituted in.
Drop your .dcp file in that folder.
Now the part every tutorial forgets to mention: restart Lightroom Classic. Profiles don’t appear in the Develop module until Lightroom re-scans the folder at startup. Quit completely — not just minimize — and relaunch.
Step 5 — Apply the Profile and Sync Across Your Shoot
Open Lightroom Classic. Go to the Develop module and select any photo shot under the same lighting as your reference frame.
- In the Basic panel at the top, find the Profile dropdown (right below the Treatment toggle).
- Click the four-square grid icon next to the dropdown to open the Profile Browser.
- Expand the section with your camera’s name.
- Click your custom profile to apply it.
To apply to the rest of the shoot:
- Fastest method: in the Develop module, right-click your corrected reference photo → Settings → Sync Settings → check only “Calibration” and “Profile” → apply to the rest.
- Preset method: save the profile as a User Preset once applied, then apply that preset on import for future shoots under the same lighting.
Both methods work. I use the first one for one-off shoots and the second for recurring studio setups.
How to Verify the Profile Actually Worked
A profile that installed fine isn’t always a profile that’s doing its job. Here’s the 30-second sanity check I run every time.
Open your reference frame with the new profile applied. Grab the White Balance dropper (the eyedropper in the Basic panel). Click it on the Neutral 5 patch — that’s patch #22, the middle gray square on the bottom row.
Now look at the RGB readout in the histogram panel. All three channels should read within one or two points of each other. In other words: R ≈ G ≈ B.
If one channel is off by more than 3 or 4 points, something went wrong. Usually it’s one of two things: the chart was overexposed or underexposed when you shot the reference frame, or Lightroom is applying the wrong profile because the one you installed got overwritten by another with the same name.
The fix is almost always to re-shoot the reference frame with a cleaner exposure and rebuild the profile. It’s faster than debugging.
Dual-Illuminant Profiles: When You Need Them
Most of the time, a single-illuminant profile is enough. One chart, one profile, applied to every photo from that lighting setup.
A dual-illuminant profile combines two reference frames — one shot under warm light (typically tungsten at around 3200K) and one shot under cool light (typically daylight at around 6500K). The software interpolates between the two based on the white balance of each photo, so the profile adapts as the color temperature changes.
You actually need a dual-illuminant profile when:
- You shoot under mixed lighting where daylight and artificial sources are present in the same frame — common in interiors and real estate.
- You want one portable profile for a camera that moves between many scenes without carrying a stack of single-illuminant profiles.
- You’re delivering the profile to a client or colorist who doesn’t want to manage multiple files.
To build one: shoot two reference frames as described in Step 1, one in warm light and one in cool. In DNG Profile Editor, File → Export With Dual Illuminant and select both DNGs.
Honestly, I don’t create these often. A fresh single-illuminant profile per shoot is more accurate in almost every case, and the time to create one is five minutes. Dual-illuminant is a convenience trade, not an accuracy upgrade.
Five Common Problems and How to Fix Them
I’ve seen these five come up almost every week from people emailing us at CalibVision.
Problem 1. “The profile installed but my photos still look wrong.”
Almost always means the chart was shot in different light from the actual photos. Re-shoot the chart in the exact same light as your subjects, rebuild the profile, re-apply.
Problem 2. “DNG Profile Editor can’t detect my chart.”
Three causes, in order of frequency. Chart is too small in the frame — re-shoot with the chart filling 10% or more. Chart is tilted relative to the lens — keep it perpendicular, use a grip or stand if you need to. Chart is over- or under-exposed — re-shoot with the white patch landing at L* = 95.
Problem 3. “My profile doesn’t appear in Lightroom after installing.”
Two things. First, quit and relaunch Lightroom completely — not just close the window. Second, double-check the folder path. On Mac, it has to be ~/Library/Application Support/Adobe/CameraRaw/CameraProfiles/, not ~/Documents/.... The most common mistake on macOS is dropping the .dcp into the wrong Library folder.
Problem 4. “Colors look over-saturated after applying the profile.”
A ColorChecker profile is built from raw data at zero saturation. If you have a preset or Lightroom default that adds saturation, the profile is doing its job correctly — the boost is coming from your preset on top. Reset saturation to 0 and see how the profile alone looks before layering anything else.
Problem 5. “Skin tones look worse, not better.”
Some camera makers deliberately warm up skin rendering in their stock profiles because it’s more flattering. A neutral ColorChecker profile gives you accurate skin, which can look less flattering than an inaccurate stock profile. That’s not a bug. Either accept the accurate baseline and warm up selectively in post, or stick with the camera’s built-in profile for portrait work and use your ColorChecker profile only for product, fine art, and reproduction.
FAQ
Do I need the old X-Rite ColorChecker Camera Calibration plugin?
No. X-Rite discontinued it in 2022. Adobe DNG Profile Editor does the same job and is still free to download.
Can I use one profile for multiple cameras?
No. Every camera body has its own color rendering. Even two of the same model — two Sony A7IVs — won’t match perfectly out of the box. Build a separate profile per camera.
Does this workflow work in Lightroom Mobile or Lightroom CC?
Not directly. Mobile and CC don’t support installing custom DCP profiles. The only path is to build the profile in Classic, and Lightroom will sync some settings through your Cloud catalog — but native Cloud color calibration is limited.
How often should I build a new profile?
Once per major lighting setup. If your studio strobe configuration stays the same for three months, one profile covers three months. If your lighting changes, re-profile. There’s no “expiration” on a profile other than the lighting it was built for.
My chart is bigger than the frame. Is that a problem?
Yes. Reframe so all 24 patches are visible with a small margin around them. DNG Profile Editor needs the chart edges to calibrate the patch geometry correctly. If your chart size doesn’t work for your working distance, consider a smaller size from our ColorChecker 24 lineup.
Will this workflow work with ColorChecker charts from other brands?
Yes. The 24-patch layout is standard. A CalibVision ColorChecker, an X-Rite ColorChecker Classic, a Calibrite ColorChecker Classic — they all auto-detect in DNG Profile Editor the same way. The only thing that varies between brands is the pigment formulation and long-term color stability.
Get a ColorChecker 24 from CalibVision
We manufacture the 24-patch ColorChecker in 10 sizes at CalibVision, from a 25×40 mm Nano for macro and endoscope cameras up to a 1600×2844 mm 8X for machine vision production lines. Every chart is QC-measured against the published reference values before it ships. A per-batch ΔE certificate is available on request, free of charge.
If you’re not sure which size to get, the Classic at 216×279 mm is the industry default and the most forgiving choice for general photography and video work.
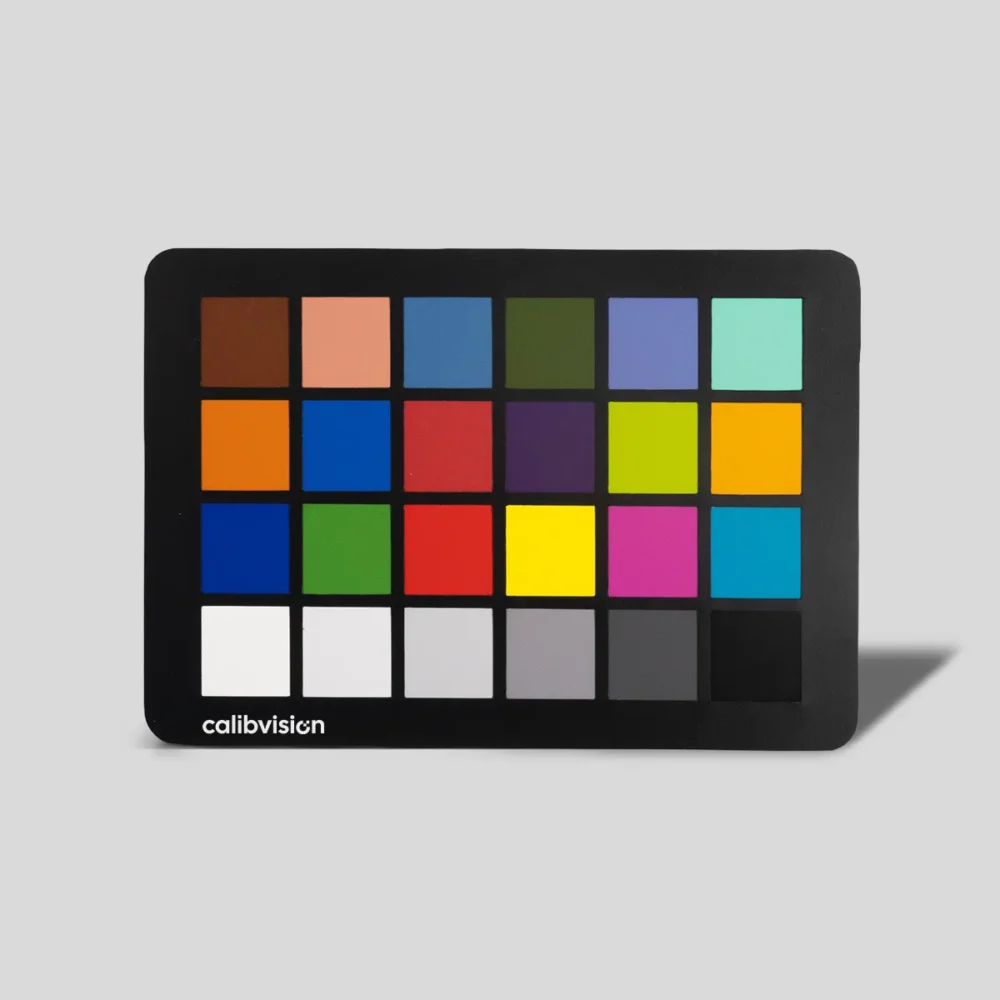
Color Checker 24 for True Color Reproduction & Camera Calibration
- 24 calibrated color patches for reliable color reproduction
- Ensures accurate white balance and consistent color results
- Designed to simulate real-world objects (skin, plants, sky)
- Uniform spectral reflectance for repeatable measurement
- Suitable for camera calibration, ISP tuning & imaging QA
- Works across photography, machine vision & color workflows
What to Read Next
- ColorChecker 24: The Complete Guide for Photographers, Filmmakers and Vision Engineers — the main guide covering what the 24 patches do, size selection, and every software workflow including DaVinci Resolve and Capture One.
- How to Use a ColorChecker 24 in DaVinci Resolve
- ColorChecker 24 vs Passport: Which One Should You Buy
- Best ColorChecker Size for Each Type of Photography


3 Responses