
The ColorChecker 24 has been around since 1976. Half a century later, photographers, filmmakers, and machine vision engineers still reach for it as the first tool to fix color problems.
I’ve spent years making these charts at CalibVision. In this guide, I’ll walk you through what the 24 patches actually do, how to use one in Lightroom and DaVinci Resolve, which size fits your work, and when it’s time to replace yours. I’ll also share a few things most blog posts skip over.
Let’s start with the basics.
What is a ColorChecker 24?
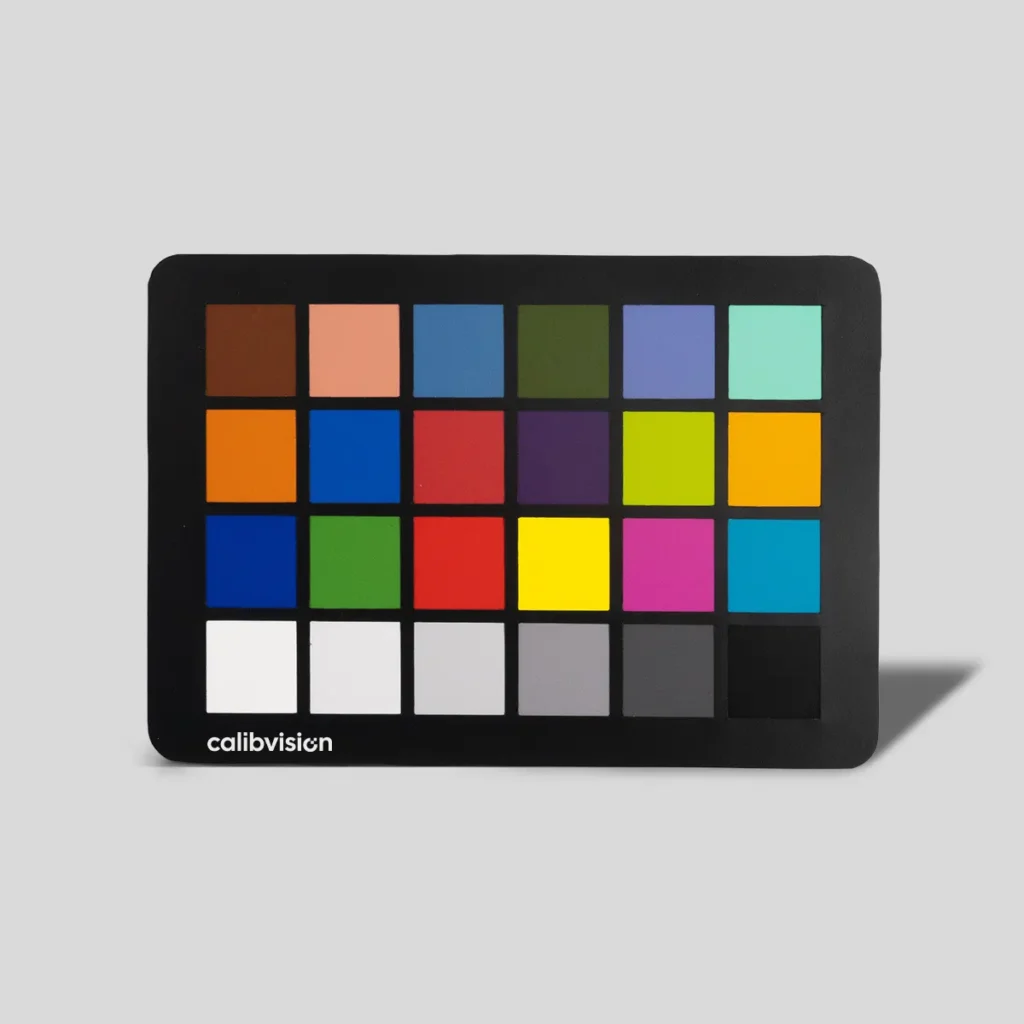
A ColorChecker 24 is a small printed card with 24 color squares arranged in a 4×6 grid. Each square is made to match a published color value. Two photographers anywhere in the world can shoot the same chart and get comparable color data.
That’s the whole idea. Sounds simple, but it’s the foundation of color-accurate photography and video.
The first 18 patches are colors you see in real scenes — skin tones, blue sky, foliage, common reds and yellows. The last 6 are a grayscale ramp from white to black. You use the colored patches to build a calibration profile for your camera, and the grays to set white balance and check exposure.
People use the ColorChecker 24 for three things:
- Camera calibration — building a custom color profile for a specific camera and lens combination
- White balance correction — fixing color casts caused by different light sources
- Color matching — keeping color consistent across multiple cameras, sessions, or operators
If you only post photos to Instagram, you probably don’t need one. If you shoot portraits, products, video, or anything where the customer expects accurate color, you do.
What are the 24 colors on a ColorChecker?
The 18 colored patches aren’t random. Each one was chosen for a reason.
The top row is natural objects most cameras struggle with — dark skin, light skin, blue sky, foliage, blue flower, bluish green. If your camera handles these six well, it’ll handle most real scenes well.
The middle row is common gamut sampling — orange, purplish blue, moderate red, purple, yellow green, orange yellow. These check how your camera handles colors that fall between primaries.
The third row is printing primaries and secondaries — blue, green, red, yellow, magenta, cyan. These are what your printer cares about, and what older calibration software was originally designed around.
The bottom row is the part most people use day-to-day. Six grayscale patches from white at L* = 95 down to black at L* = 21. This is what you reach for when you need to fix white balance fast, or check that your exposure isn’t clipping at either end.
Every patch has a published reference value in three notations:
- sRGB for digital workflows
- CIE Lab* for measurement and profiling software
- Munsell notation for academic and traditional color science
We list the full reference table on our ColorChecker 24 product page, so you can copy values straight into your profiling tool.
How do you use a ColorChecker 24?
Five steps. The whole thing takes 30 seconds in the field and maybe 2 minutes back at your computer.
Step 1. Place the chart in the same light as your subject.
Same source. Same intensity. Same direction. If your subject is by a window, the chart needs to be by the same window. This is the part people get wrong most often. They shoot the chart in different light from the subject, and the calibration ends up correcting for the wrong scene.
Mixed lighting is the hardest case. If half your subject is lit by daylight and half by a tungsten lamp, no single chart shot can fix it. You either control the lighting better, or you accept that color will only be approximate.
Step 2. Frame the chart flat.
The chart’s surface should be perpendicular to your lens. Don’t tilt it. Try to fill at least 5-10 percent of the frame.
If you’re shooting from far away, you’ll need a bigger chart. More on that in the size section below.
Step 3. Shoot one RAW frame.
RAW only. JPEG already has color baked in by your camera, and you can’t undo that. The whole point of color profiling is to work on the unprocessed sensor data, before any in-camera color decisions get applied.
Make sure the white patch (#19) reads around L* = 95 in your histogram, and the black patch (#24) isn’t crushed to zero. If either end is clipped, your profile will be wrong.
Step 4. Generate a profile in your editor.
Open the RAW file in your color tool of choice. Most tools auto-detect the 24 patches and build the profile in seconds:
Lightroom and Camera Raw work with the free Adobe DNG Profile Editor
Capture One has its own Color Editor and ICC profile generator
DaVinci Resolve has Color Match built into the Color page
Lumariver Profile Designer is the more advanced option for multi-illuminant profiles
Each tool has its quirks, and the exact button-clicks differ. We have a separate post that walks through the Lightroom workflow step by step and another for DaVinci Resolve.
Step 5. Apply the profile to the rest of the shoot.
Sync the profile to every image you shot under that lighting. Done. As long as the light doesn’t change, you don’t need to recalibrate.
If you move from indoor to outdoor mid-shoot, capture the chart again. A profile only works for the lighting it was made under.
Which size ColorChecker should you buy?
This is the question I get asked most often. The honest answer: it depends on how far you sit from your subject.
A common mistake is buying a Mini-size chart for studio portrait work. From 3 meters away, a 109mm chart is too small for the calibration software to read patches reliably. As a rule of thumb, the chart should fill at least 5-10 percent of your frame. Smaller than that, and the math breaks down.
The opposite mistake is also real. Buying a huge studio chart for vlogging is awkward to carry and overkill for the camera resolution. Bigger isn’t more accurate.
Here’s the rough match between size and use case for the CalibVision ColorChecker 24 lineup:
| Model No. | Size | Image Surface | Backing/Mounting |
| CV-CC24-NANO-PV | Nano (1×1.6 in / 25×40mm) | Optical Photo Paper | PVC Mounted |
| CV-CC24-MINI-PV | Mini (4.3×2.5 in / 109×63.5mm) | Optical Photo Paper | PVC Mounted |
| CV-CC24-CLASSIC-PV | Classic (8.5×11 in / 216×279mm) | Optical Photo Paper | PVC Mounted |
| CV-CC24-LITE-PV | Lite ( 9.5×6.7 in / 240×170mm) | Optical Photo Paper | PVC Mounted |
| CV-CC24-L-PV | Large ( 11.8×8.3 in / 300×210mm) | Optical Photo Paper | PVC Mounted |
| CV-CC24-XL-PV | XL (22.5×14.5 in / 570×370mm) | Optical Photo Paper | PVC Mounted |
| CV-CC24-2XL-PV | 2XL(46.5×32.5 in / 1180×826mm) | Optical Photo Paper | PVC Mounted |
| CV-CC24-4X-FP | 4X (31.5 × 56.0 in / 800×1422mm) | Optical Photo Paper | None |
| CV-CC24-MEGA-PV | Mega (40×60 in / 1020×1520mm) | Optical Photo Paper | PVC Mounted |
| CV-CC24-MEGA-FP | Mega (40×60 in / 1020×1520mm) | Optical Photo Paper | None |
| CV-CC24-8X-FP | 8X (63×112 in / 1600×2844mm) | Optical Photo Paper | None |
If you’re between two sizes, go with the larger one. You’ll regret undersizing more than oversizing.
The Classic size at 8.5×11 inches is the industry default for one practical reason — it matches US Letter paper, so it sits naturally in studios and ships in standard envelopes. If you’re not sure which to buy and your work is general photography, start with the Classic.
We make all 10 sizes at CalibVision. Pricing runs from $101.70 for the Nano up to $1,850.22 for the 2XL Frame Mounted edition, and you can see the full lineup on our ColorChecker 24 product page.
ColorChecker 24 vs ColorChecker Passport: what’s the difference?
This comes up on every photography forum eventually.
The short version: a ColorChecker 24 is a single flat card with 24 patches. The Passport is a tri-fold plastic case that contains the same 24 patches plus extra targets for white balance and creative warming or cooling.
If you mostly shoot in one place — a studio, a workshop, a copy stand — get a ColorChecker 24. You can pick the right size for your working distance, and you can replace just the card when it wears out.
If you travel a lot and want one tool that does everything in your camera bag, get the Passport. The hard plastic case protects the patches from scratches, and the extra warming and cooling targets give portrait and landscape shooters a creative starting point.
Price-wise, a Classic-size ColorChecker 24 from CalibVision runs $175.51. A Passport runs around $130 retail. So the Passport is cheaper at the standard size — but it only comes in one size. If you need anything bigger or smaller, only the ColorChecker 24 family covers it.
The other quiet advantage of the standalone ColorChecker 24 is that you can replace the card alone for a fraction of the cost of buying a new Passport every few years.
Can I use a ColorChecker for video?
Yes, with two small adjustments to the photography workflow.
First, shoot a few seconds of the chart instead of one frame. This gives you a clean still to extract later, and it captures any flicker from your light source.
Second, capture the chart every time the lighting changes. If you move from indoor to outdoor mid-shoot, shoot the chart again. A profile only works for the lighting it was made under.
In DaVinci Resolve, the workflow is dead simple. Drop your clip on the timeline, go to the Color page, and use the Color Match feature. Point it at your chart, click match, and Resolve builds the correction automatically. This is one of the things Resolve does better than any other NLE.
In Premiere Pro, there’s no built-in chart match. You’ll either use a third-party plugin like Lumetri Color presets, or export a frame to DaVinci, generate the LUT there, and bring it back into Premiere.
In Final Cut Pro, you’ll mostly do this manually with Color Wheels and Color Curves. There are paid plugins that automate it, but nothing built into the application.
For multi-camera shoots, the value of a ColorChecker goes way up. Two Sonys can’t match each other out of the box. Sony and Canon definitely can’t. A chart shot at the start of each camera’s first take is the only reliable way to get them aligned in post.
Do I really need a ColorChecker if I shoot in RAW?
Honest answer: probably not, if you’re shooting for yourself.
RAW files give you a lot of latitude to fix color in post. Modern cameras have decent default profiles. For Instagram, family photos, casual landscape work, you can get away without a chart your whole career.
But here’s where the math changes.
You shoot portraits or fashion. Skin tones are the make-or-break of a portrait. Your eye notices a 2 percent shift in skin tone instantly, even if you can’t name what’s off. A chart-based profile gets you closer to neutral than guessing.
You shoot products or e-commerce. The customer expects the on-screen color to match the box. If your product comes in 8 shades of blue and the customer can’t tell which one they ordered, you have a returns problem. Color accuracy is a direct line to revenue.
You shoot fine art reproduction, paintings, fabrics, or archival material. These are color-critical by definition. A museum or archivist will reject your work if the color isn’t documented and reproducible across sessions.
You shoot with multiple cameras that need to match. Two cameras of the same brand and model don’t even match each other perfectly out of the box. Cross-brand is worse. A chart per camera per setup is the only way.
You do video color grading. Scene-to-scene consistency without a reference chart is guesswork.
You work in machine vision, scientific imaging, or any kind of measurement photography. Without a calibrated reference, your data isn’t reproducible. That’s not optional.
If you fall into any of these, yes, you need one.
How long does a ColorChecker last?
A well-kept ColorChecker holds its reference values for 2 to 3 years of professional use.
What kills it faster:
Direct sunlight (fades the magenta and yellow patches first)
Skin oil from your fingers (changes how patches reflect light)
Scratches on the matte surface
Humidity above 70 percent for extended periods
A few signs it’s time to replace yours. The white patch shows visible yellowing. The black patch has any reflective spots or scratches. Your calibration results are drifting between sessions that should match. It’s been 3+ years even if it still looks fine.
Pigments don’t last forever. The simplest workaround is to keep your chart in its sleeve when not in use, never touch the patches with bare hands, and check it against a fresh chart every couple of years.
We measure every batch we ship at CalibVision and provide a per-batch ΔE certificate on request. If you’re doing color-critical work, ask for it before you order — it’s free, but you have to know to request it.
How much does a ColorChecker 24 cost?
Prices range from about $30 for a generic pocket-size card up to $2,000 for a studio-grade Mega chart.
The big variables are size and brand. A Mini-size chart from a direct manufacturer might run $30 to $90. The same size from Calibrite or X-Rite is closer to $90 to $130. A Mega Frame Mounted from any brand is $800 or more.
CalibVision’s current pricing across the 10 sizes:
| Size | Price (USD) |
| Nano (25×40 mm) | $101.70 |
| Classic (216×279 mm) | $175.51 |
| Lite (240×170 mm) | $195.44 |
| Mini (109×63.5 mm) | $289.22 |
| Large (300×210 mm) | $476.54 |
| XL (570×370 mm) | $659.38 |
| 4X (800×1422 mm) | $1,231.67 |
| 8X (1600×2844 mm) | $1,715.54 |
| 2XL (1180×826 mm) | $1,850.22 |
Why such a big range? Bigger charts use more pigment, are harder to keep flat during manufacturing, and cost more to ship. Brand matters too — Calibrite and X-Rite charge a premium for the name and the bundled software, even though the underlying 24-patch standard is the same across manufacturers.
You can see all 10 sizes and current stock on our ColorChecker 24 page.
A few common questions
Are all ColorChecker 24 charts the same?
The 24-patch layout is standardized, but pigment formulations vary slightly between manufacturers. Charts from X-Rite, Calibrite, Datacolor, and CalibVision all work with standard color profiling software. For the most consistent results across multiple charts over time, stick with one brand and replace from the same source.
What’s the difference between ColorChecker 24 and ColorChecker SG?
The 24 has 24 patches. The Digital SG has 140 patches and a semi-gloss finish. SG is used mostly in commercial printing and academic research where wider gamut profiling matters. For 95 percent of photographers and filmmakers, the 24 is enough.
Can I make my own ColorChecker?
Technically yes — you can print the reference values on photo paper. But home-printed pigments drift in color and don’t reflect light evenly, which defeats the entire purpose. A real ColorChecker uses spectrally engineered pigments that match the published standard within tight tolerance, typically a delta-E under 2. DIY isn’t worth it.
Can I use a ColorChecker for printer calibration?
No. The ColorChecker 24 is a camera calibration tool. For printer profiling you need a different chart, typically the IT8.7/4 or the ColorChecker Digital SG. Don’t mix them up.
Does it matter which side of the chart I shoot?
The standard ColorChecker 24 is a single-sided card with 24 patches. Some Datacolor and X-Rite Passport variants have a second face with a larger gray patch for white balance. If your chart only has one face, you’ve got the standard 24 and that’s all you need for most workflows.
Can the chart be glued to a wall or rig?
Yes. CalibVision ships the chart with a flat PVC backing or no backing depending on your selection. The PVC version stays flat for years and can be mounted to any rigid surface. The unmounted version is what you want if you plan to rig it into a frame yourself, like for production lines or copy stands.
Get a ColorChecker 24 from CalibVision
We make the ColorChecker 24 in 10 sizes, from the Nano (25×40 mm) for microscopes and dental cameras, to the 8X (1600×2844 mm) for machine vision production lines. Every chart is QC-measured against the published standard before it ships. We provide a per-batch ΔE certificate on request.
If you’re not sure which size you need, the Classic at 8.5×11 inches is the industry default for general photography. If you’re shooting from far away or running a wide-FOV camera, sized up to XL or 2XL. If you need help matching a size to a specific application, our team can recommend one over email.
Color Checker 24 for True Color Reproduction & Camera Calibration
- 24 calibrated color patches for reliable color reproduction
- Ensures accurate white balance and consistent color results
- Designed to simulate real-world objects (skin, plants, sky)
- Uniform spectral reflectance for repeatable measurement
- Suitable for camera calibration, ISP tuning & imaging QA
- Works across photography, machine vision & color workflows
Related Reading
If you want to go deeper on any one topic, we have separate guides on these:
- How to Use a ColorChecker 24 in Lightroom (step-by-step)
- How to Use a ColorChecker 24 in DaVinci Resolve
- ColorChecker 24 vs Passport: which one should you buy
- Best ColorChecker size for each type of photography
- How long does a ColorChecker last and when to replace it
- What are the 24 colors on a ColorChecker (full reference values)


2 Responses